How to make oat flour at home
Make your own oat flour at home. With only one ingredient and a high-speed blender, you can have perfect gluten-free flour to make pancakes and cakes in no time.
Servings: 1 serving
Ingredients
- 1 cup whole rolled oats (gluten-free if necessary)
Instructions
- Prepare the Oats: Measure out 1 cup of whole rolled oats. Ensure they are gluten-free if you need the oat flour to be entirely gluten-free.
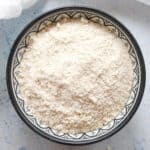
- Blend the Oats: Transfer the oats to a high-speed blender or a food processor. Blend on high until the oats turn into a fine, flour-like consistency. This process might take about 1-2 minutes.
- Check the Texture: Pause blending occasionally to check the texture. The oat flour should be smooth without any coarse or gritty particles.
- Sieve (Optional): If you prefer an extra fine texture, you can sift the oat flour through a fine mesh sieve to remove any larger particles.
- Store: Transfer the oat flour to an airtight container. Seal it well to prevent moisture. Store in a cool, dry place.
- Now your homemade oat flour is ready to use in your favorite recipes. Enjoy baking!
Notes
- Best Oats for Making Flour: Whole rolled oats (also known as old-fashioned oats) are the best choice for making oat flour. They are steamed and flattened, preserving their nutrients and making them ideal for grinding into a fine flour texture.
- Avoid Steel-Cut Oats: Steel-cut oats have a dense and coarse texture, making them less suitable for grinding into flour without specialized equipment.
- Consider Quick Oats: Quick oats can be used for oat flour, but they are pre-cooked and rolled thinner, which might slightly alter the texture of your recipes. If using quick oats, be mindful of the potential change in consistency.
- Storage Instructions: Transfer the oat flour into an airtight container, ensuring the lid is tightly sealed to prevent moisture. Store the container in a cool, dry pantry or cupboard away from direct sunlight. When stored properly, homemade oat flour can last for several months.
