Best Gluten-Free Pizza Crust Recipe (no yeast)
What could be better than a homemade pizza that is crunchy on the outside and nice and soft in the middle? A gluten-free pizza of course! Especially when it is made with only wholesome ingredients like buckwheat flour. It is also freeform yeast and xanthan gum.
SAVE THIS RECIPE 💌
Gluten-free pizza crust recipe
It might well be that you haven’t had a good pizza for a long time! Because let’s face it gluten-free pizzas are boring, with a chewy crust and dry middle, you know the story… And the good ones that you might find at Italian places are contaminated with wheat flour. It can be so frustrating!
Today you are in luck because I will share my favorite gluten-free pizza recipe. This pizza dough recipe is not only gluten-free, but it is also free from xantham gum or yeast. It is perfect for many people on restrictive diets and food allergies. And while we are on it, why not try my buckwheat bread recipe? It is made with one ingredient only.
So next time you are thinking of ordering a takeaway pizza, give this homemade gluten-free pizza recipe a go, it is as good as the real deal! Looking for a quick pizza recipe? Try the easy pizza toast recipe, it is ready in 5 minutes.
Delicious gluten-free pizza? Yes, it is possible!
Why you should try this recipe:
- Easy to make: This gluten-free pizza crust is ridiculously easy to make. It is all mixed in one bowl, no kneading, or dough-proofing is required. Just mix the ingredients and bake. You don’t even need a rolling pin!
- Gluten-free: This pizza base is 100% gluten-free. It is made with buckwheat and tapioca flour and is a great choice for those with gluten sensitivities.
- Restrictive diet friendly: It is free from eggs, nuts, rice, soy, and refined sugar.
- Kids and budget-friendly: Despite being gluten-free, this buckwheat pizza base tastes delicious. My kids never ask if it is gluten-free and always enjoy it on a pizza night, which makes it a perfect family dinner.
In my opinion, this is the best gluten-free pizza recipe out there.
Ingredients

Ingredients notes
- Buckwheat flour. Delicious and versatile flour to use in gluten-free baking. Available from health food stores.
- Tapioca flour (or tapioca starch). Tapioca flour adds elasticity and a little bit of gooeyness to our pizza crust. You can use cassava flour instead of tapioca, see details in the recipe card.
- Baking powder. If you are following a strict gluten-free diet opt for gluten-free baking powder.
See the full list of ingredients in the recipe card below 👇
How to make it
This is the part I love about this gluten-free pizza crust recipe. It is EASY!
Start by preheating your oven or pizza oven to 200’C (400’F) and lining a baking tray with some parchment paper.

Step 1: Put the dry ingredients into a medium-sized mixing bowl.

Step 2: Add the wet ingredients, such as warm water, extra virgin olive oil and apple cider vinegar. Mix to combine.

Step 3: Prepare a baking sheet by laying it with a piece of parchment paper or simply brushing it with some olive oil, using a pastry brush. Pour the batter onto the sheet and spread with a spoon or a spatula to form a circle.

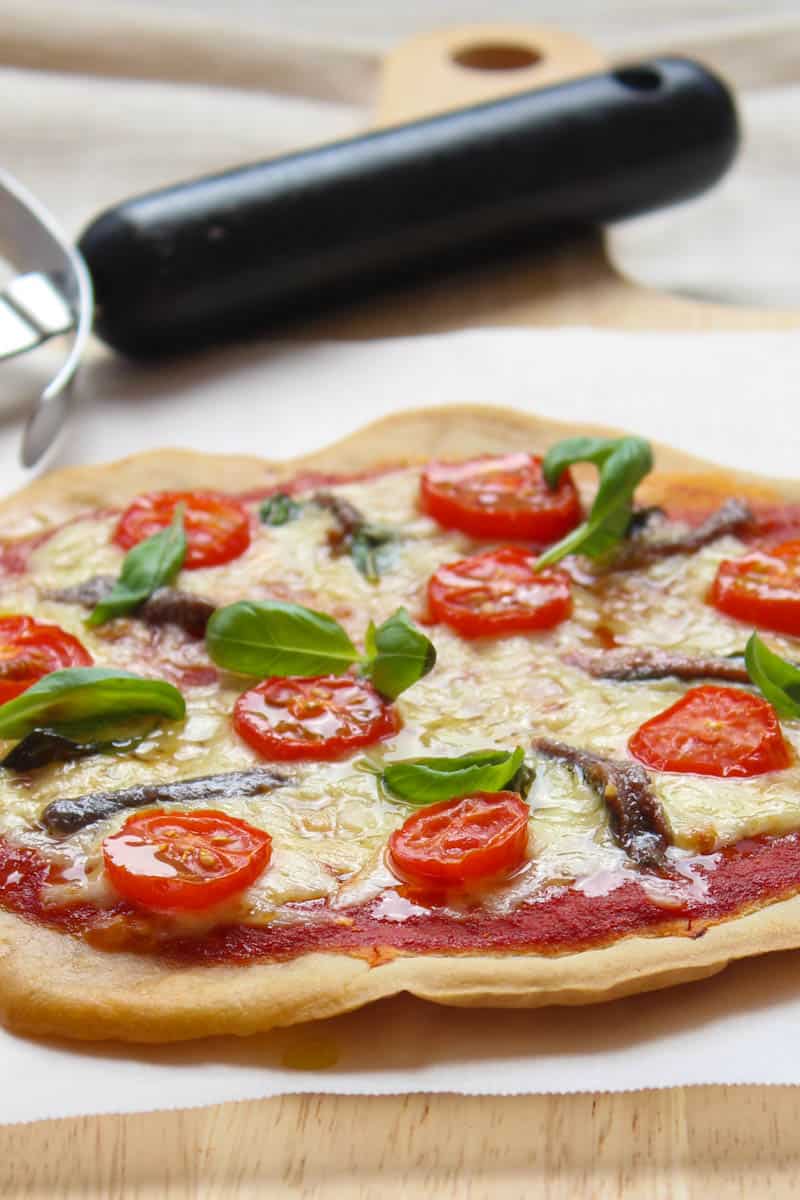
Step 4: Bake for 15 minutes. Let the pizza base cool a little and pull the parchment paper off the pizza base.

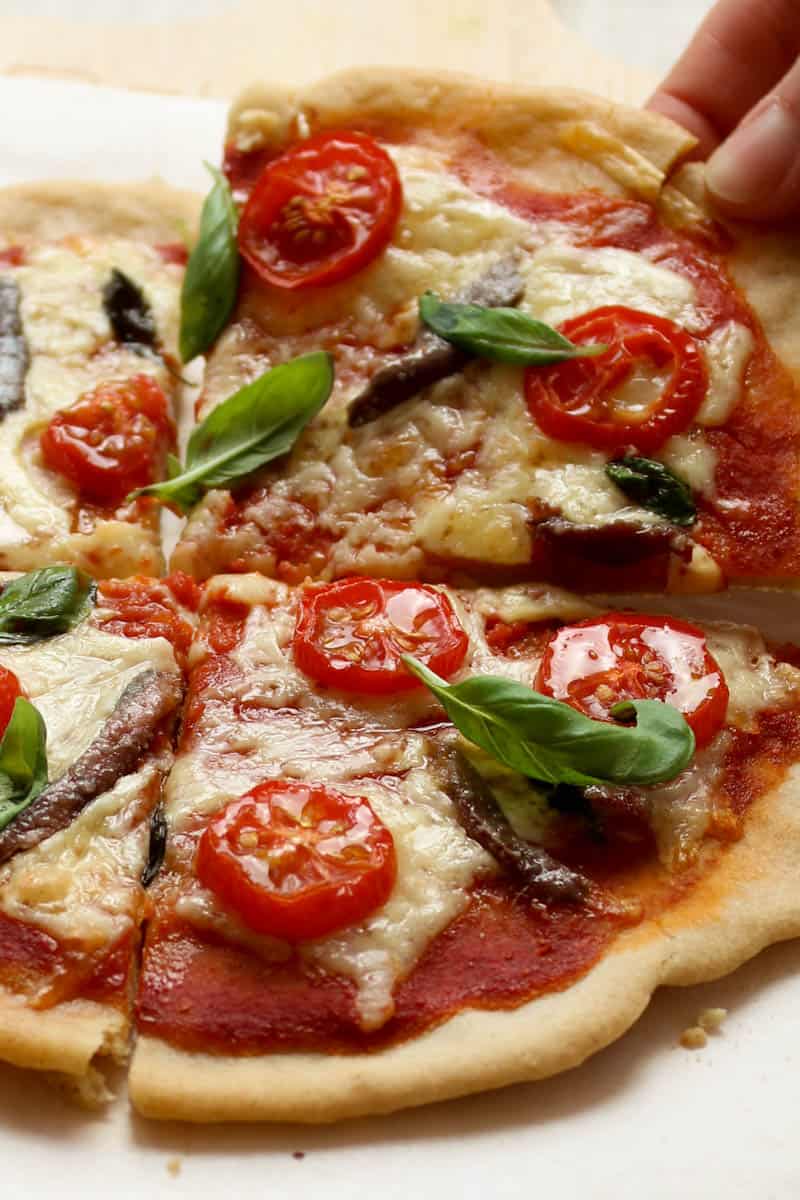
Step 5: Place the pizza base on an oven tray and top the pizza with your favorite toppings. Bake for another 10-15 minutes until cheese has melted.

Step 6: Bake for 15 minutes. Let the pizza base cool a little and pull the parchment paper off the pizza base.
Expert Tips:
1. Don’t be discouraged by the look of the pizza when you take it out of the oven. It might look a little wonky-donkey, but that is ok. It will turn out perfectly beautiful and delicious. Watch my video below to see how I made this pizza crust.
2. The thicker you spread the dough the thicker will be the pizza base. For a thin crust spread the dough thinly.
3. The baking time might vary depending on your oven and how thin or thick you spread the batter. Add another 5 to 10 minutes if you think the pizza base isn’t baked through.
4. You can use a pizza stone if you have one. I still would use some parchment paper or brush it with some olive oil, to prevent sticking.
Toppings for pizza
There are no rules on how to top your pizza. There are Italian places that top their pizza with melted chocolate and strawberries. I am yet to try to make it myself.
This time I simply went for the classic variant with some tomato sauce, fresh cherry tomatoes, anchovies, and basil leaves. Top your pizza base with whatever your heart desires. With lots of cheese of course! Bring back the pizza night!
How to serve
Do you really need tips on how to serve a pizza? 😉 Just dig in!
Ok, maybe add some fresh salad such as Cucumber avocado salad or Mediterranean Chickpea Salad. Roasted vegetables are a great idea too, try our Quick grilled zucchini slices and Mediterranean Grilled Eggplant Recipe.
❄️ How to Store
Refrigerate:
You can store leftovers in an airtight container and enjoy them the next day for lunch.
Freeze it:
You can prebake the pizza base in advance and freeze it without toppings in a Ziploc bag or airtight container for 1 month. Defrost it on a kitchen bench, bake for 10 minutes to refresh the crust, top with toppings of your choice, and bake for another 10 minutes.
Reheat:
Reheat the pizza in the oven for 10-15 minutes.
Frequently asked questions
The dough in this recipe IS runny. It is similar to flat pancake dough. Do not add more flour.
While many people have successfully made this recipe without parchment paper, I recommend using it to prevent the dough from sticking.
If you don’t want to use the baking paper, make sure to generously brush the tray with some olive oil.
The recipe is made with buckwheat flour and tapioca starch, which are naturally gluten-free and are 100% safe for people with celiac disease or gluten sensitivity.
Have you tried this recipe? If so, I'd greatly appreciate it if you could leave a star rating and share your thoughts in a comment. Your feedback means a lot to me, and it can also help others who are interested in trying it out. Thank you! 🌟👩🍳

Best Gluten-Free Pizza Crust Recipe (no yeast)
SAVE THIS RECIPE 💌
Ingredients
- 1 cup of buckwheat flour
- 3 spoons of Tapioca starch. If using Cassava flour use only 2 tablespoons
- 1/4 cup olive oil
- 1 tablespoon of apple cider vinegar
- 1 teaspoon gluten-free baking powder
- 1 cup of water at room temperature
Instructions
- Preheat your oven to 200’C (400’F)
- Combine the dry ingredients into a medium size mixing bowl.
- In a separate bowl, combine the wet ingredients, such as warm water, extra virgin olive oil and apple cider vinegar. Mix to combine.
- Add the wet ingredients to the dry ingredients and mix to combine. The dough consistency will be runny like thin pancake batter.
- Prepare a baking sheet by laying it with a piece of parchment paper or by simply brushing it with some olive oil, using a pastry brush. You can use a pizza stone if you have one. I still would recommend you use some parchment paper or brush it with some olive oil, to prevent sticking.
- Spread the pizza dough onto the prepared sheet using a spatula or a tablespoon to spread the batter. This recipe makes one large or two medium-size pizzas.
- Bake for 15 minutes. It might take a little longer depending on your oven and how thick you spread the pizza dough.
- Let the pizza base cool a little and pull the parchment paper off the pizza base.
- Top the pizza base with your favorite toppings and bake for another 10-15 minutes and enjoy!
Video
Notes
- Don’t be discouraged by the look of the pizza when you take it out of the oven. It might look a little wonky-donkey, but that is ok. It will turn out perfectly beautiful and delicious. Watch my video below to see how I made this pizza crust.
- The thicker you spread the dough the thicker will be the pizza base. For a thin crust spread the dough thinly.
- The baking time might vary depending on your oven and how thin or thick you spread the batter. Add another 5 to 10 minutes if you think the pizza base isn’t baked through.


any replacements for buckwheat flour?
Hi Terri, I haven’t tried to make this pizza dough with any other flour myself but one of my readers made it with sorghum flour and she quite liked it. But like I said, I haven’t tried it. Let me know if you give it a go. Elena 😊
I loved the almost sour dough flavor! However, though following the measurements, ingredients and directions exactly, the dough mixture was not runny and thin at all, but very doughy! It looked nothing like the picture.
. As a dough-y crust, it was still tasty, but not easy at all to spread on the parchment paper. I will keep playing with the measurements, as I did indeed like the flavor, I would like to get the dough-y version thinner and crispier if at all possible.
Hi Maryann, thank so much you for taking the time to leave a comment! So happy to hear you enjoyed the flavour! I wonder why your batter got so thick. Have you watched the video on how I made it? Maybe try adding a little bit more water? The batter is supposed to be quite runny, like the batter for the thin pancakes. To get a thinner and crispier crust you need to spread the batter quite thinly. Elena
!!!!!!!!!!